
Introduction
Do you want to save time and effort by automating your social media posts across different platforms? Do you want to learn how to use Microsoft Power Automate to post on BlueSky and Mastodon with ease? If so, this guide is for you.
Integrating Mastodon with Hugo Blog for Comment Management
To streamline the management of comments on my Hugo blog, I have implemented a Mastodon workflow. This workflow allows for easy retrieval of Mastodon post IDs. I use Mastadon as my comments platform as described in Carl Schwan’s blog post.
Creating the Flows:
I will provide you a detailed breakdown suitable for a custom implementation. This guide will ensure even those not deeply familiar with technical details can follow along.
Detailed guide for creating a Custom BlueSky Posting Workflow in Microsoft Power Automate
Introduction
This section focuses on setting up a custom workflow in Microsoft Power Automate for posting updates to BlueSky, a social media platform. The workflow involves creating a session, posting content, and handling responses. At the time of writing, BlueSky is still invite-only, so you’ll need to request access to the platform before you can use this workflow. If you need access plesae contact me via Twitter, LinkedIn or in the comments down below.
Prerequisites
- Access to Microsoft Power Automate.
- BlueSky account credentials and API access.
Tips:
- Ensure you correctly handle the authentication and authorization part, particularly the management of JWT tokens.
- Test each part separately to ensure they work as expected.
- Be mindful of the data structure expected by BlueSky’s API when creating posts.
This should give you a good starting point for rebuilding the BlueSky posting workflow in Power Automate. Adjust the steps according to your specific requirements and the exact response structure of the BlueSky API.
Create a New Flow in Power Automate
- Log in to Microsoft Power Automate.
- Navigate to My flows.
- Click on New flow and select Instant cloud flow.
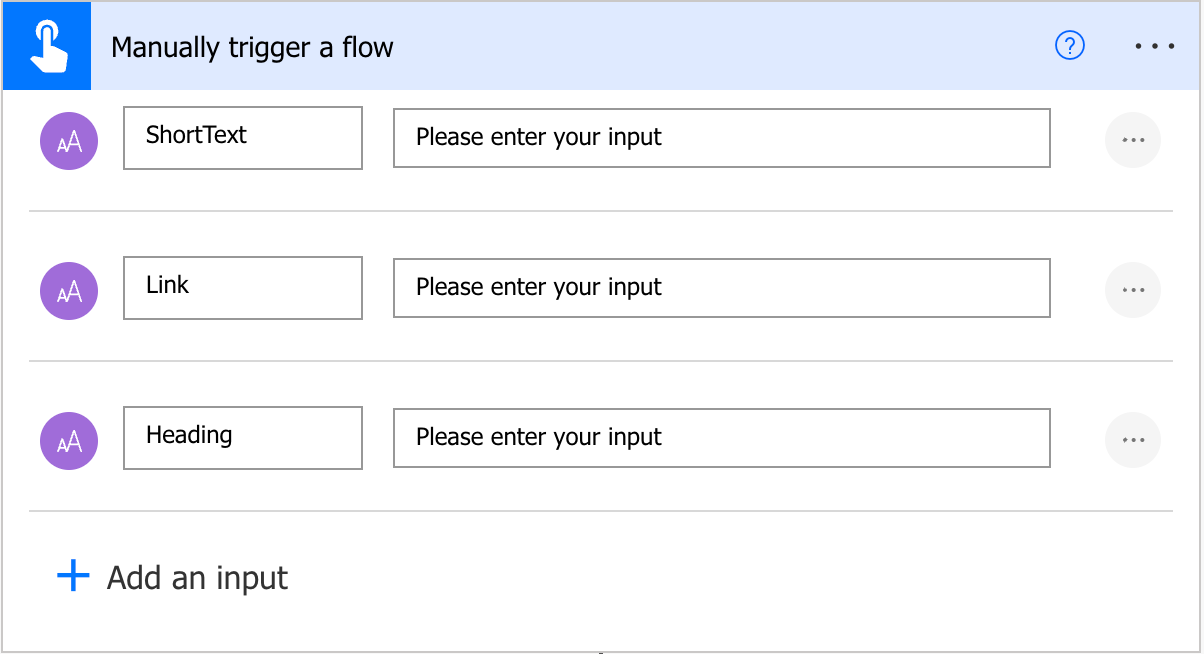
- Name your flow, e.g., “Send to BlueSky”, and select the Manually trigger a flow trigger. Click Create.
Steps and Expressions (BlueSky)):
-
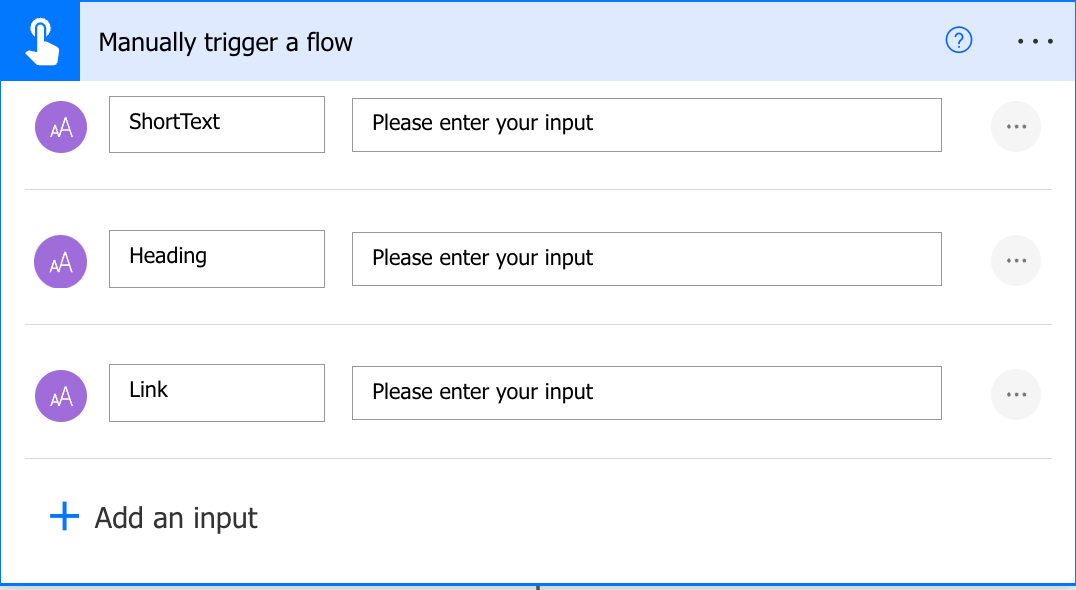
Trigger: Manual trigger with text, link, and heading inputs.
-
Initialize Variable - Complete Text:
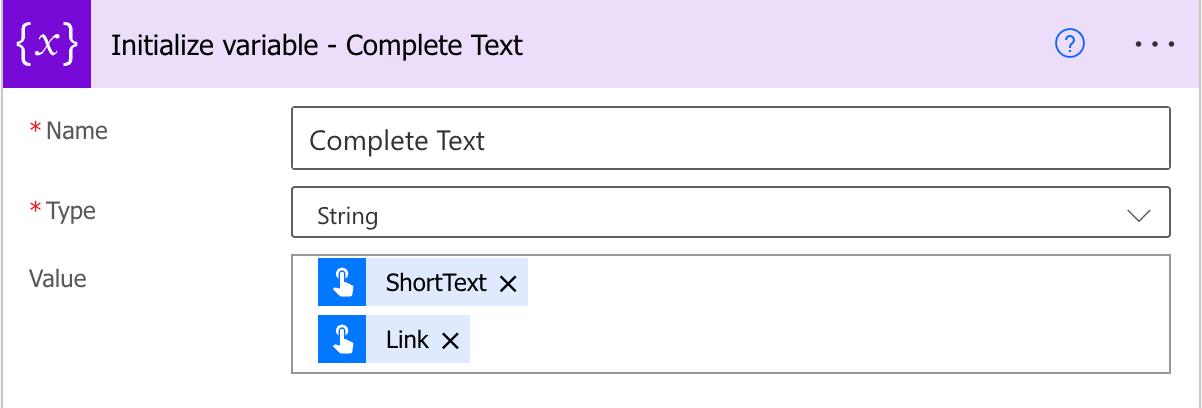
@{triggerBody()?['text']} @{triggerBody()?['text_1']} -
Initialize Variable - Remove Line Breaks:
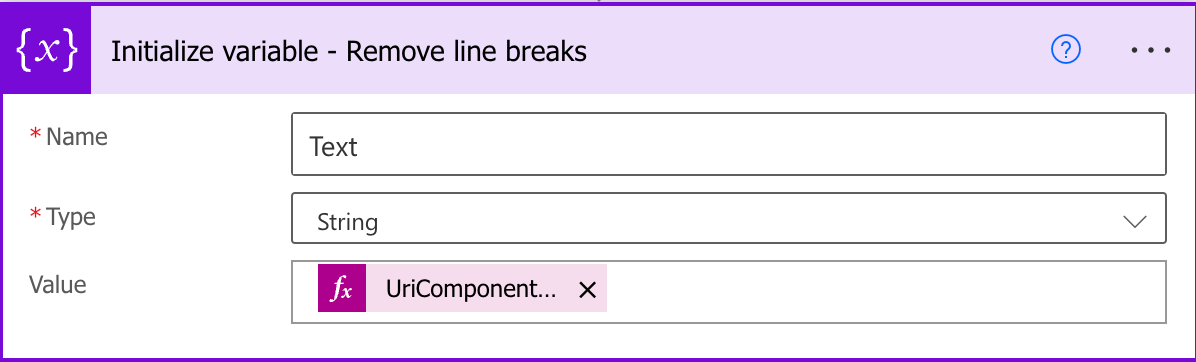
@{UriComponentToString(replace(uriComponent(triggerBody()?['text']) '%0A' ''))} -
Initialize Variable - Facets: As an array variable.
-
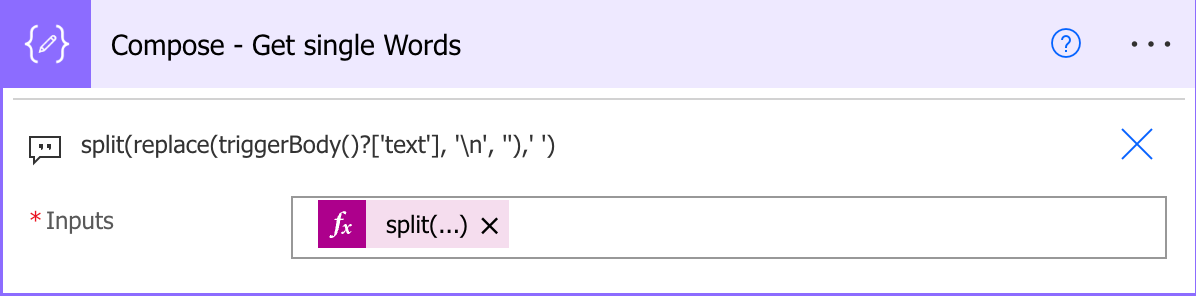
Compose - Get Single Words:
- Expression:
@split(variables('Text'),' ')
- Expression:
-
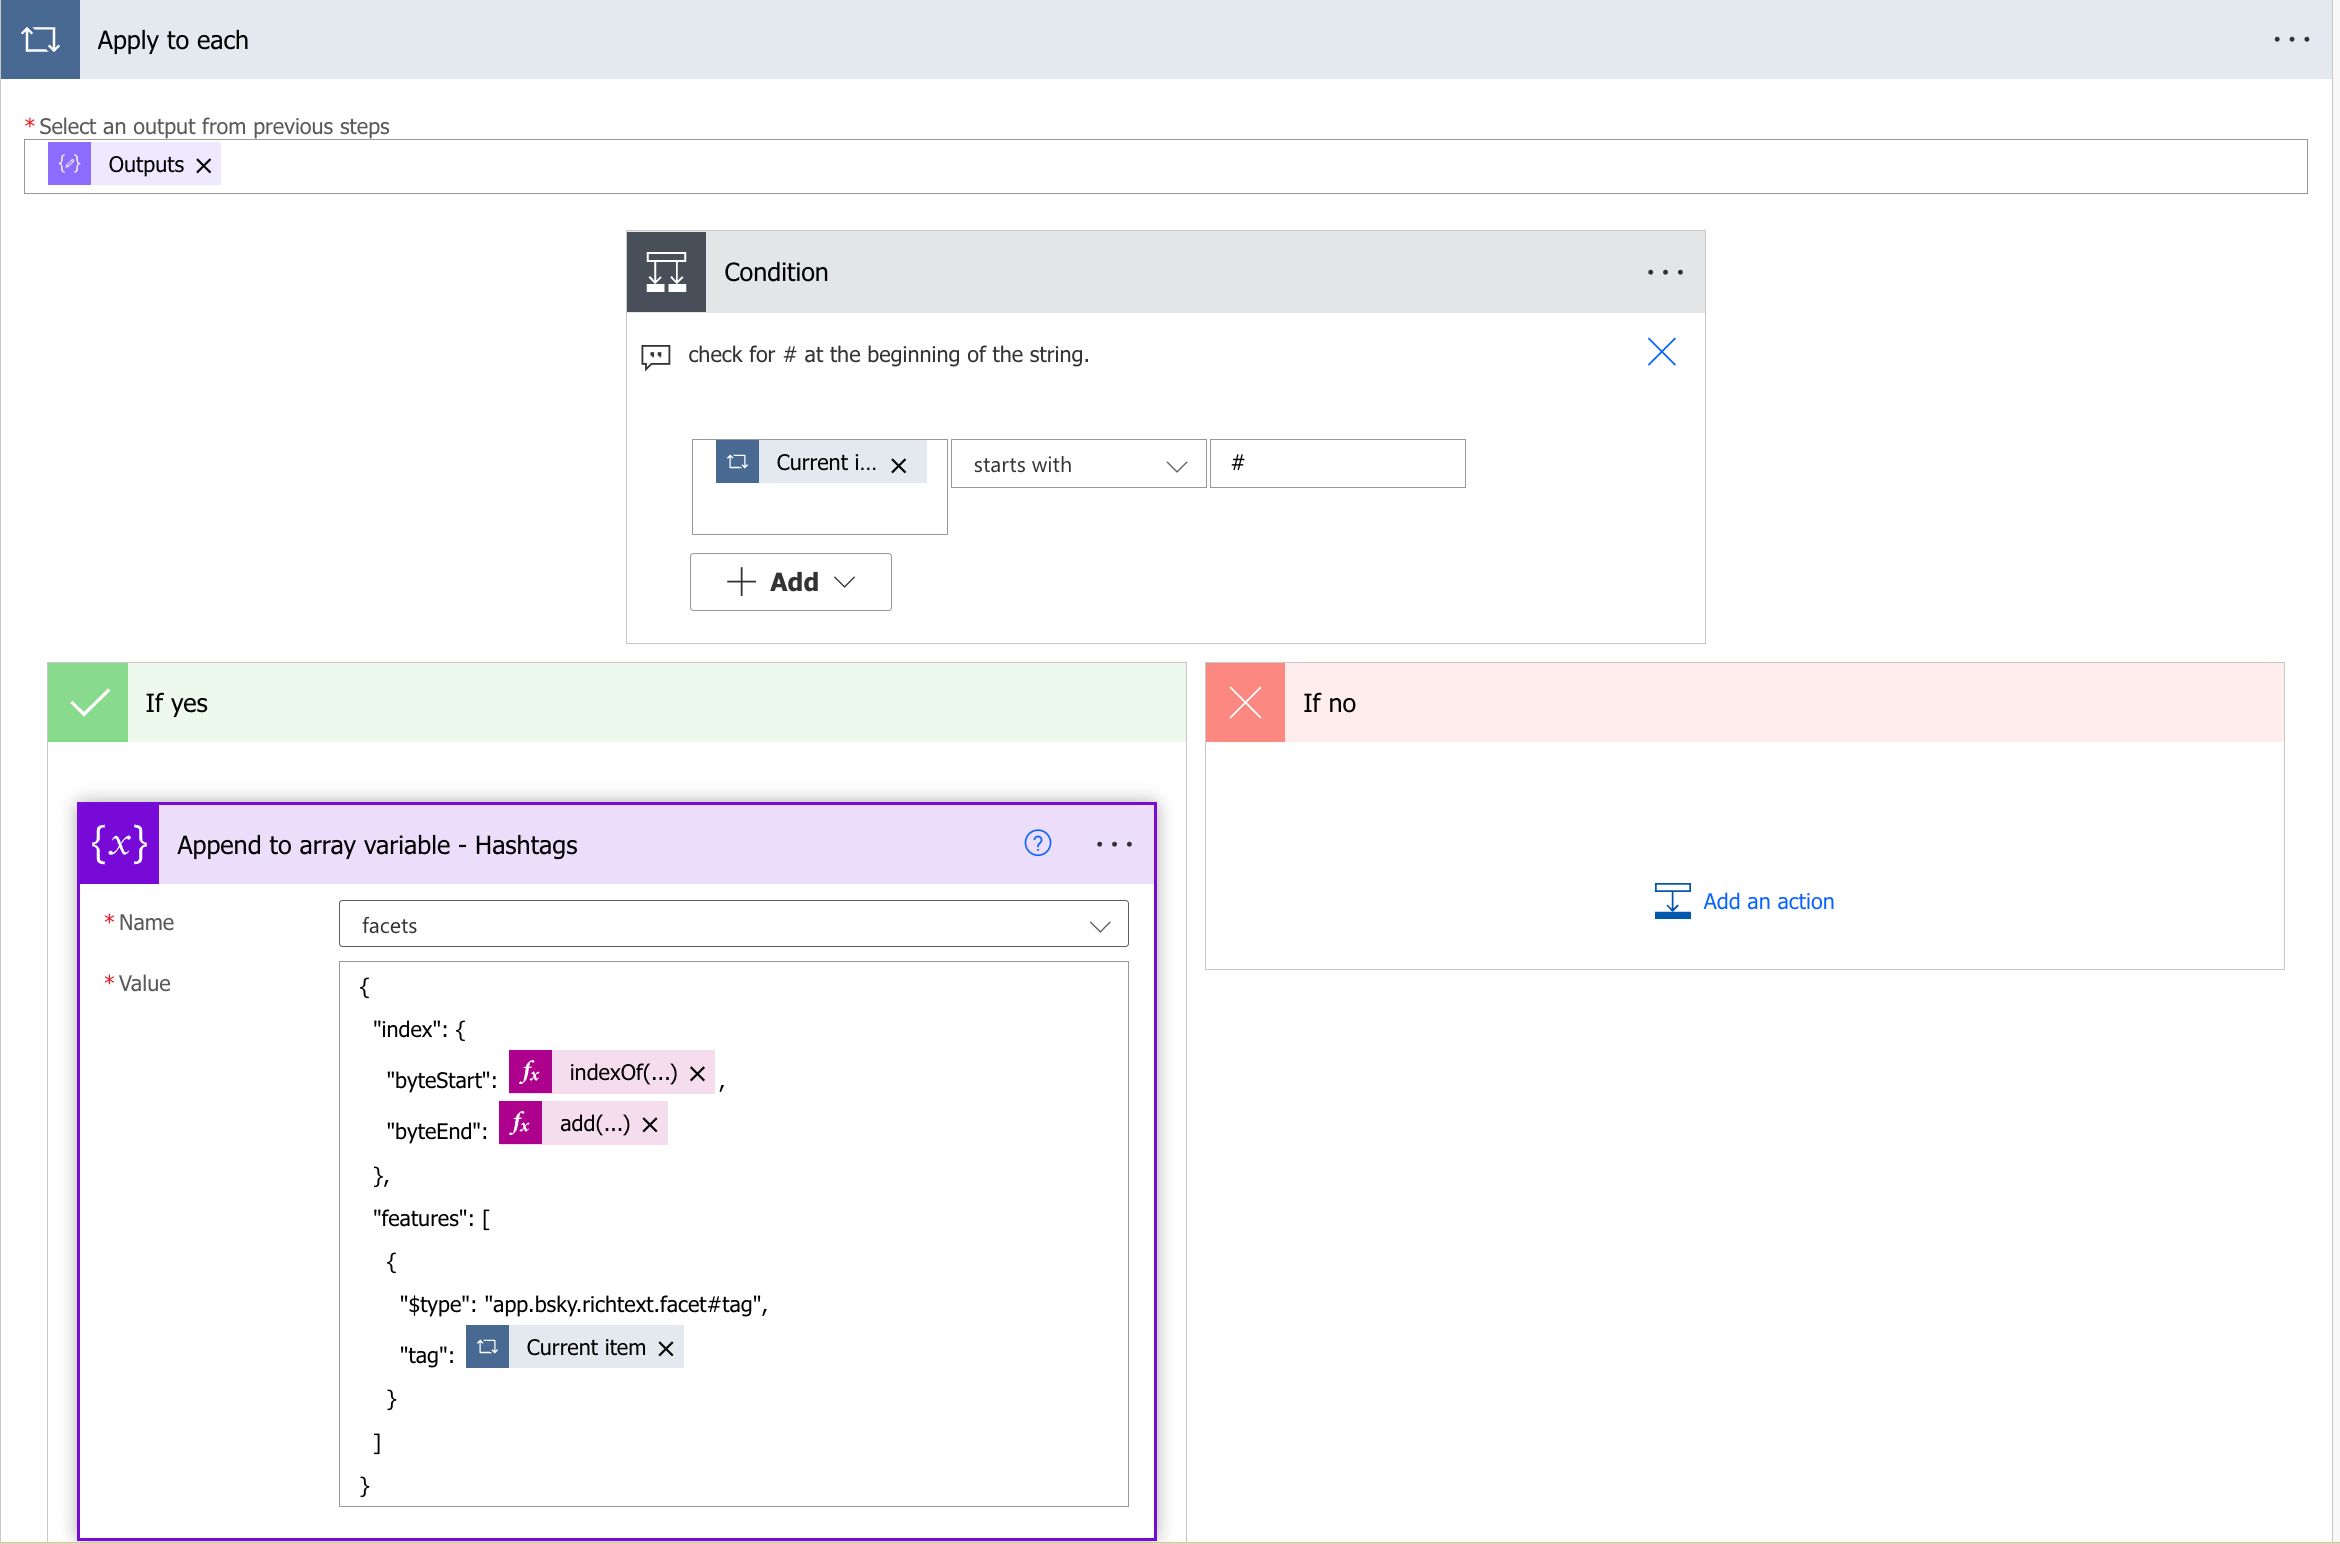
Apply to Each: Based on ‘Compose - Get Single Words’ output.
-
Condition: Checks for hashtag (#) in each item.
- Expression:
startsWith(@items('Apply_to_each'),'#')
- Expression:
-
Append to Array Variable - Hashtags:
- Expression for tag:
{ "index": { "byteStart": @{indexOf(triggerBody()['text'], item())}, "byteEnd": @{add(indexOf(triggerBody()['text'],item()),length(item()))} }, "features": [ { "$type": "app.bsky.richtext.facet#tag", "tag": @{item()} } ] }
- Expression for tag:
-
Append to Array Variable - Mentions:
- Expression for Links:
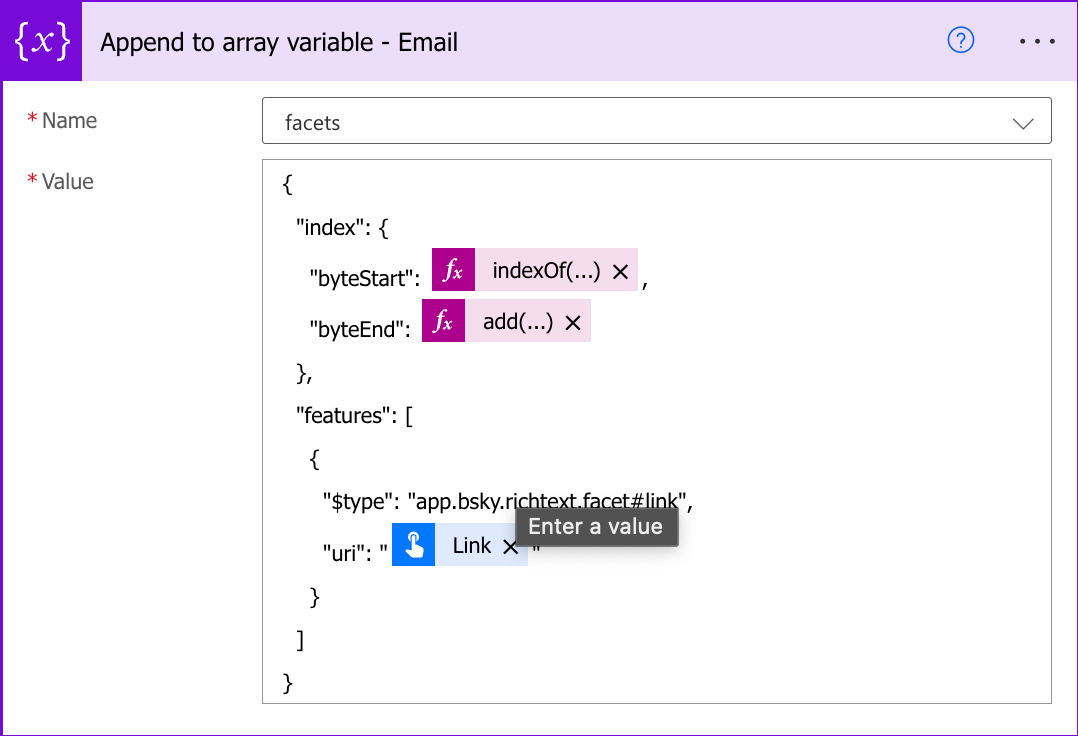 Explanation: The expression uses the Complete Text variable to find the position of the link in the text using the indexOf function. It then creates the link facet using the link input from the trigger. For more information on the BlueSky API, refer to the documentation.
 1
 2
 3
 4
 5
 6
 7
 8
 9
10
11
12
13
14
15
16
17
18
19
20
21
22
23
24
{ "index": { "byteStart": @{indexOf(variables('Complete Text'), item())}, "byteEnd": @{add(indexOf(variables('Complete Text'),item()),length(item()))} }, "features": [ { "$type": "app.bsky.richtext.facet#mention", "handle": "@{item()}" } ] } { "index": { "byteStart": @{indexOf(variables('Complete Text'), triggerBody()['text_1'])}, "byteEnd": @{add(indexOf(variables('Complete Text'),triggerBody()['text_1']),length(triggerBody()['text_1']))} }, "features": [ { "$type": "app.bsky.richtext.facet#link", "uri": "@{triggerBody()['text_1']}" } ] }
- Expression for Links:
-
HTTP - Create Session:
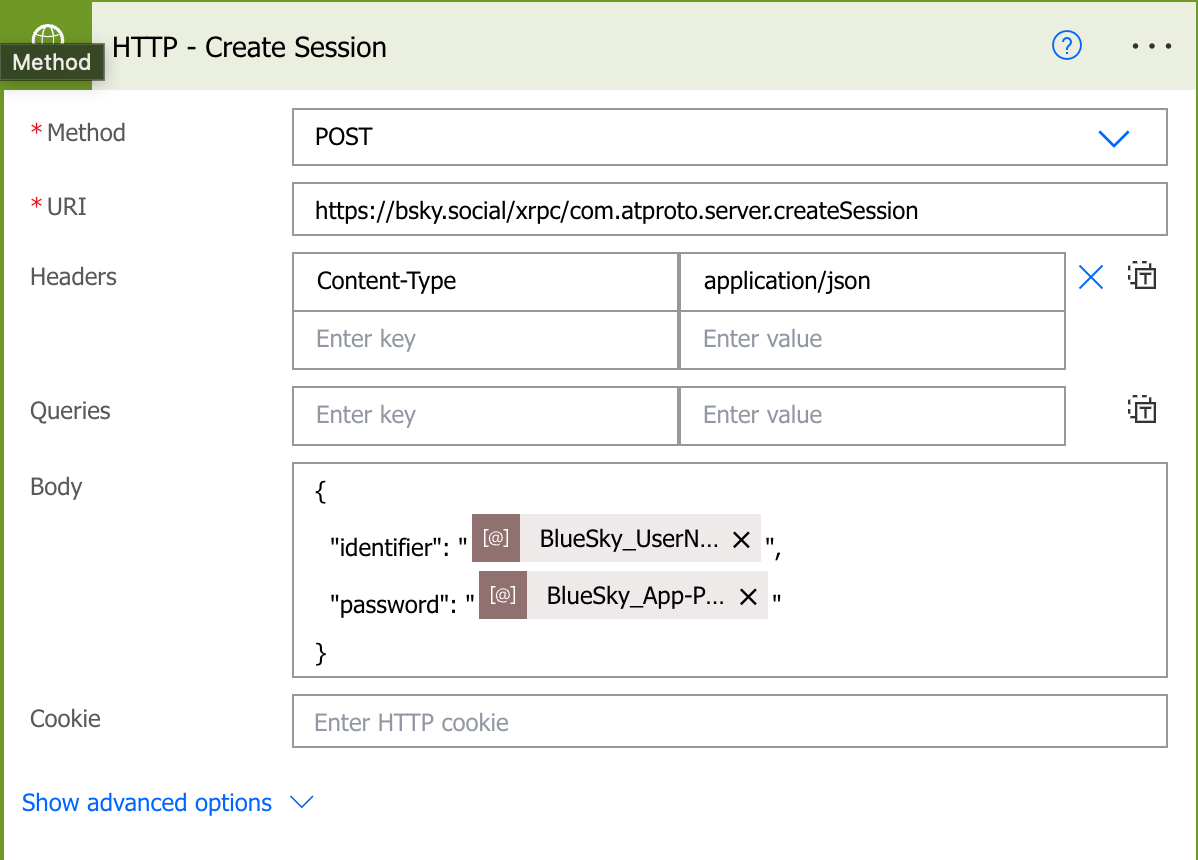
- URI:
https://bsky.social/xrpc/com.atproto.server.createSession - Body:
{ "identifier": "@{parameters('BlueSky_UserName')}", "password": "@{parameters('BlueSky_App-Password')}" }
- URI:
-
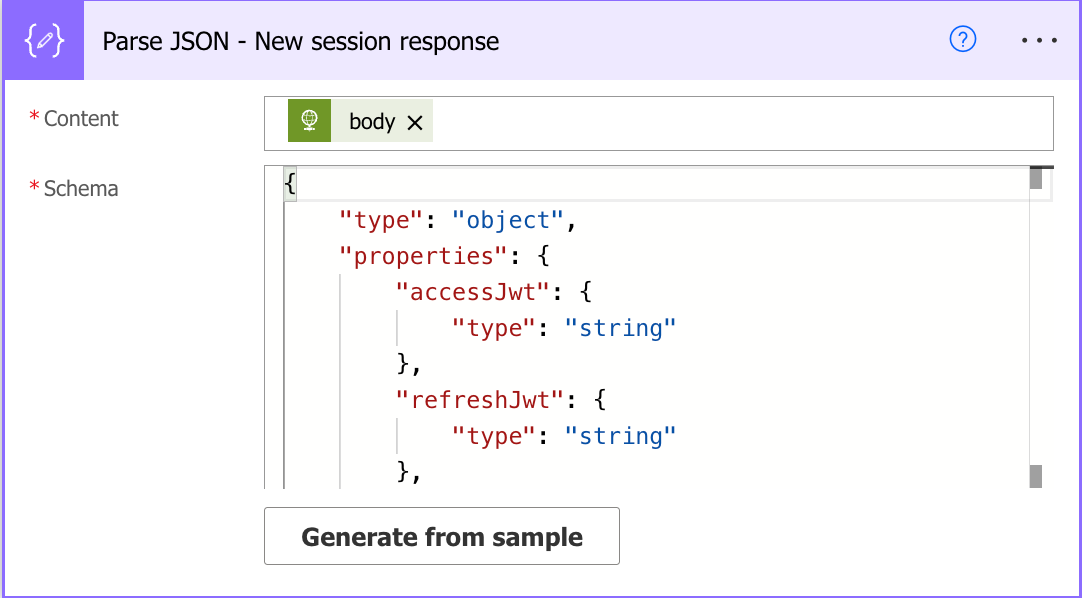
Parse JSON - New Session Response:
Tipp: Use the Generate from sample option to generate the schema. To get the sample, you can use the Run Flow option and copy the response from the Run History.
-
HTTP - Post Post:
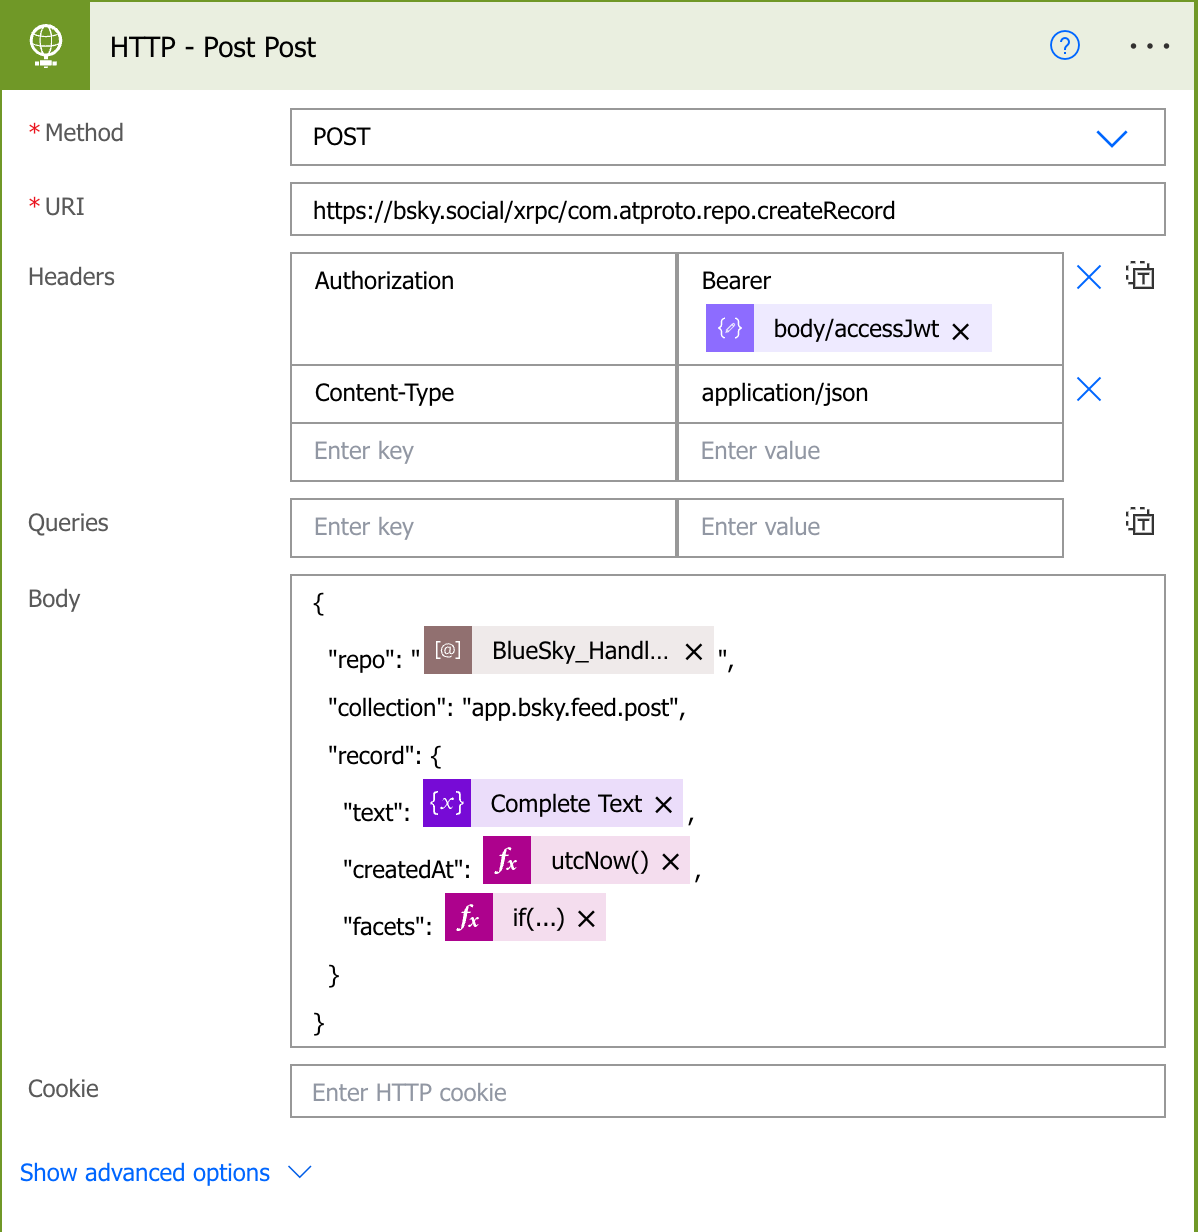
- URI:
https://bsky.social/xrpc/com.atproto.repo.createRecord - Body:
{ "repo": "@{parameters('BlueSky_HandleName')}", "collection": "app.bsky.feed.post", "record": { "createdAt": "@utcNow()", "facets": "@if(equals(length(variables('facets')),0),'[]',variables('facets'))", "text": "@variables('Complete Text')" } } - Authentication: Requires an API key from BlueSky Social’s account settings.
- URI:
Send2Mastodon
Here’s the step-by-step tutorial:
Prerequisites
- Access to Microsoft Power Automate.
- Microsoft Teams set up.
- Mastodon account and API key.
Create a New Flow in Power Automate
- Log in to Microsoft Power Automate.
- Navigate to My flows.
- Click on New flow and select Instant cloud flow.
- Name your flow, e.g., “Send to Mastodon”, and select the Manually trigger a flow trigger. Click Create.
Steps and Expressions
To recreate the workflow in Power Automate based on the provided JSON file, follow these steps:
-
Trigger: Manual trigger with text, link, and heading inputs.
-
HTTP Request to Mastodon API:
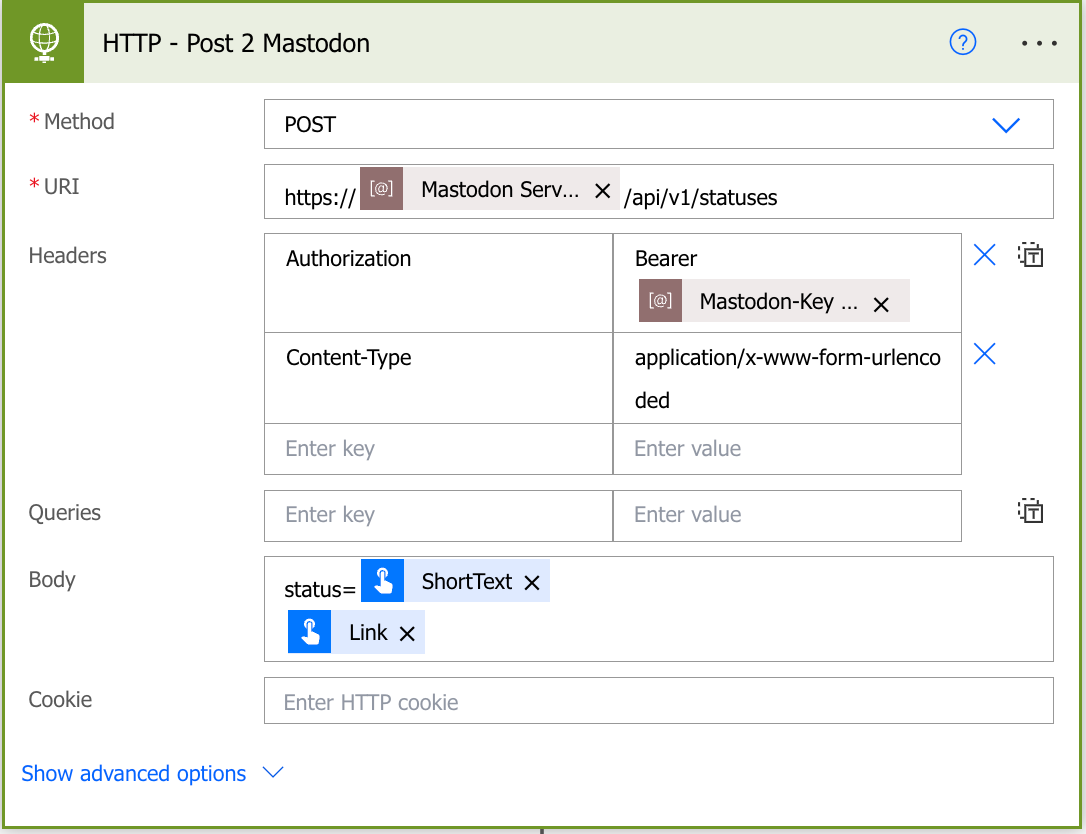
- Add an HTTP action to post a status update to Mastodon.
- Set the method to
POST. - Set the URI to
https://[Mastodon Server Link]/api/v1/statusesreplace[Mastodon Server Link]with the actual server link.
I used environment variables for this as I store everything in a solution. - Add headers:
- Authorization:
Bearer [Mastodon-Key](replace[Mastodon-Key]with the actual key). - Content-Type:
application/x-www-form-urlencoded.
- Authorization:
- Set the body to send the status and link:
"status=@{triggerBody()?['text']}\n@{triggerBody()?['text_1']}".
-
Parse JSON:
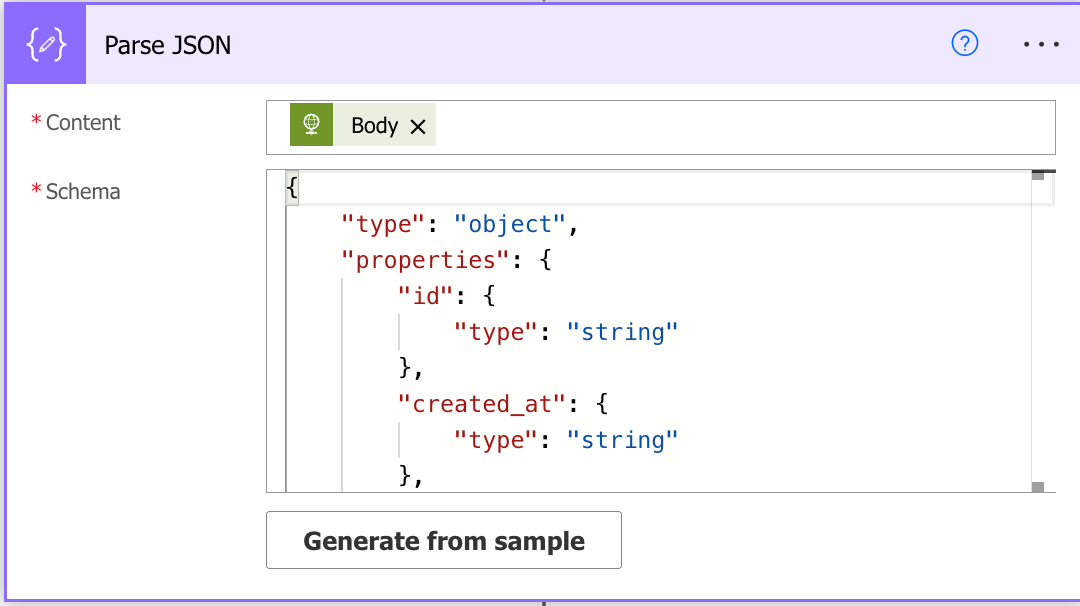
- After the HTTP request, add a “Parse JSON” action.
- Use
@body('HTTP')as the content. - Define the schema based on the expected response from the Mastodon API. Tipp: Use the Generate from sample option to generate the schema. To get the sample, you can use the Run Flow option and copy the response from the Run History.
-
Post Message in Teams Channel:
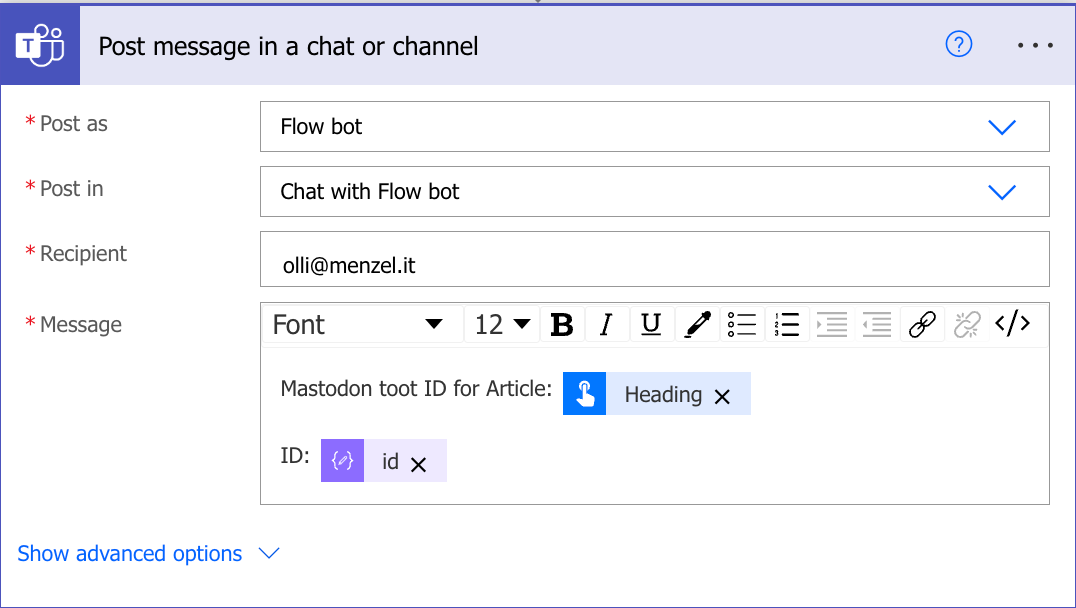
- Add an action to post a message in a Teams chat or channel.
- Configure the message to include the Mastodon toot ID and the heading from the trigger inputs.
- Use the expression
@{triggerBody()?['text_2']}for the heading and@{body('Parse_JSON')?['id']}for the Mastodon toot ID.
-
Final Steps:
- Save and test the flow to ensure it works as expected.
- Make any necessary adjustments to the expressions and configurations based on your specific requirements and the structure of your Mastodon instance and Teams setup.
Conclusion
This guide provides an overview of using Microsoft Power Automate to automate social media posts across various platforms, like BlueSky, Mastodon and LinkedIn. I hope you found this guide useful and that it helps you to get started with Power Automate. If you have any questions or feedback, please leave a comment below. Also you can combine this with a SharePoint list to create a queue for your posts. If this is interessting for you I will cover this in a future post. I added the Flows to my GitHub repo so you can download them and import them into your environment.